User Guide
In this guide, we will describe:
- how to install the package
- how to use the software, including any requirements
- the different running modes supported by the software
benchcab has been designed to work on NCI machine exclusively. It might be extended later on to other systems.
Pre-requisites
To use benchcab, you need to join the following projects at NCI:
Quick-start
To launch a benchcab run, execute the following in the command line:
module use /g/data/xp65/public/modules
module load conda/benchcab
cd /scratch/$PROJECT/$USER
git clone https://github.com/CABLE-LSM/bench_example.git
cd bench_example
# Edit config.yaml to your liking
vim config.yaml
benchcab run
Installation
The package is already installed for you in the Conda environments under the xp65 project. You simply need to load the module for the conda environment:
   module use /g/data/xp65/public/modules
   module load conda/benchcab
You need to load the module on each new session at NCI on login or compute nodes.
Save the module location
You should not put any module load or module add commands in your $HOME/.bashrc file. But you can safely store the module use /g/data/xp65/public/modules command in your $HOME/.bashrc file. This means you won't have to type this line again in other sessions you open on Gadi.
Usage
benchcab allows you to run an ensemble of configurations for CABLE using any number of code versions. benchcab can be used along 3 major modes:
- Regression test: running two versions of CABLE with the same standard set of science configurations.
- New feature: running two versions of CABLE with the same standard set of science configurations except one version is patched to use a new feature.
- Ensemble run: running any number of versions of CABLE with the same set of customised science configurations.
The regression and new feature run modes should be used as necessary when evaluating new developments in CABLE.
Create a work directory
Choose a location
You can run the benchmark from any directory you want under /scratch or /g/data. /scratch is preferred as the data in the run directory does not need to be preserved for a long time. The code will create sub-directories as needed. Please ensure you have enough space to store the CABLE outputs in your directory, at least temporarily until you upload them to modelevaluation.org.
The full test suite will require about 22GB of storage space.
The HOME directory is unsuitable
Do not use your $HOME directory to contain the work directory as it does not have enough space to contain the outputs.
Setup the work directory
The simplest is to clone an existing work directory with git and then adapt it to your case. Such an example work directory is available on GitHub under the CABLE-LSM organisation.
git clone git@github.com:CABLE-LSM/bench_example.git
Once the work directory is cloned, you will need to adapt the config.yaml file to your case. Refer to the description of the options for this file.
Running with CABLE v2.x
Defaults in benchcab are set to run version 3 of CABLE. To run with version 2, check the "running with CABLE version 2.x" page for information on specific setup required.
Run the simulations
Change directory into the cloned example work directory
cd bench_example
Warning
benchcab will stop if it is not run within a work directory with the proper structure.
Currently, benchcab can only run CABLE for flux site and offline spatial configurations. To run the whole workflow, run
benchcab run
The tool will follow the steps:
- Checkout the code branches. The codes will be stored under
src/directory in your work directory. The sub-directories are created automatically. - Compile the source code from all branches
- Setup and launch a PBS job to run the flux site simulations in parallel. When
benchcablaunches the PBS job, it will print out the job ID to the terminal. You can check the status of the job withqstat.benchcabwill not warn you when the simulations are over. - Setup and run an ensemble of offline spatial runs using the
payuframework.
Info
In case the code branches are already checked out before running Step (1) - benchcab will fail. This could happen on re-runs of benchcab. In that case, run benchcab clean realisations before the checkout step.
Warning
It is dangerous to delete src/ via rm -rf, since src/ may contain symlinks to local directories that could also be affected. Use benchcab clean realisations instead.
Expected output
You can see an example of the expected output printed out to the screen by benchcab run to check if the tool has worked as expected.
For help on the available options for benchcab:
benchcab -h
benchcab <command> -h
Running parts of the workflow
It is possible to run each step of the workflow separately using sub-commands for benchcab. Refer to the help message to learn more.
Directory structure and files
The following files and directories are created when benchcab run executes successfully:
.
├── benchmark_cable_qsub.sh
├── benchmark_cable_qsub.sh.o<jobid>
├── rev_number-1.log
├── runs
│   ├── fluxsite
│   │   ├── logs
│   │   │   ├── <task>_log.txt
│   │   │   └── ...
│   │   ├── outputs
│   │   │   ├── <task>_out.nc
│   │   │   └── ...
│   │   ├── analysis
│   │   │   └── bitwise-comparisons
│   │   └── tasks
│   │       ├── <task>
│   │       │   ├── cable (executable)
│   │       │   ├── cable.nml
│   │       │   ├── cable_soilparm.nml
│   │       │   └── pft_params.nml
│   │       └── ...
│   ├── spatial
│   │   └── tasks
│   │       ├── <task> (a payu control / experiment directory)
│   │       └── ...
│   └── payu-laboratory
└── src
    ├── CABLE-AUX
    ├── <realisation-0>
    └── <realisation-1>
benchmark_cable_qsub.sh-
the job script submitted to run the test suite and
benchmark_cable_qsub.sh.o<jobid>contains the job's standard output/error stream. rev_number-*.log-
file to keep a record of the revision numbers used for each realisation specified in the config file.
src/-
directory that contains the source code checked out from SVN for each branch specified in the config file (labelled
realisation-*above) and the CABLE-AUX branch. runs/fluxsite/-
directory that contains the log files, output files, and tasks for running CABLE in the fluxsite configuration.
runs/fluxsite/tasks-
directory that contains fluxsite task directories. A task consists of a CABLE run for a branch (realisation), a meteorological forcing, and a science configuration. In the above directory structure,
<task>uses the following naming convention: <met_file_basename>_R<realisation_key>_S<science_config_key>-
where
met_file_base_nameis the base file name of the meteorological forcing file in the FLUXNET dataset,realisation_keyis the branch key specified in the config file, andscience_config_keyidentifies the science configuration used. runs/fluxsite/tasks/<task>/-
directory that contains the executable, the input files for each task and the recorded standard output from the CABLE model run.
runs/fluxsite/outputs/-
directory that contains the netCDF output files for all tasks
runs/fluxsite/logs/-
directory that contains the log files produced by all tasks
runs/fluxsite/analysis/bitwise-comparisons-
directory that contains the standard output produced by the bitwise comparison command:
benchcab fluxsite-bitwise-cmp. Standard output is only saved when the netcdf files being compared differ from each other runs/spatial/-
directory that contains task directories for running CABLE in the offline spatial configuration.
runs/spatial/tasks-
directory that contains payu control directories (or experiments) configured for each spatial task. A task consists of a CABLE run for a branch (realisation), a meteorological forcing, and a science configuration. In the above directory structure,
<task>uses the following naming convention: <met_forcing_name>_R<realisation_key>_S<science_config_key>-
where
met_forcing_nameis the name of the spatial met forcing,realisation_keyis the branch key specified in the config file, andscience_config_keyidentifies the science configuration used. See themet_forcingsoption for more information on how to configure the met forcings used. runs/spatial/tasks/<task>/-
a payu control directory (or experiment). See Configuring your experiment for more information on payu experiments.
runs/payu-laboratory/-
a custom payu laboratory directory. See Laboratory Structure for more information on the payu laboratory directory.
Re-running benchcab multiple times in the same working directory
We recommend the user to delete the generated files when re-running benchcab after running simulations and saving the necessary output files elsewhere. Re-running benchcab multiple times in the same working directory is currently not yet supported (see issue CABLE-LSM/benchcab#20). To clean the current working directory, run the following command in the working directory
benchcab clean all
Analyse the output with modelevaluation.org
Limitations
Model evaluation for offline spatial outputs is not yet available (see issue CABLE-LSM/benchcab#193).
benchcab communicates with meorg using meorg_client package (available on xp65 conda environment in Gadi). The benchmarking results are uploaded to modelevaluation.org for further analysis, which can be seen via the web interface. To enable support:
- Go to modelevaluation.org and login or create a new account.
-
To view analysis in the web interface, one needs to enable
benchcab-evaluationworkspace. To do this, click the Current Workspace button at the top of the page, and selectbenchcab-evaluationunder "Workspaces Shared With Me".
Button to choose workspace 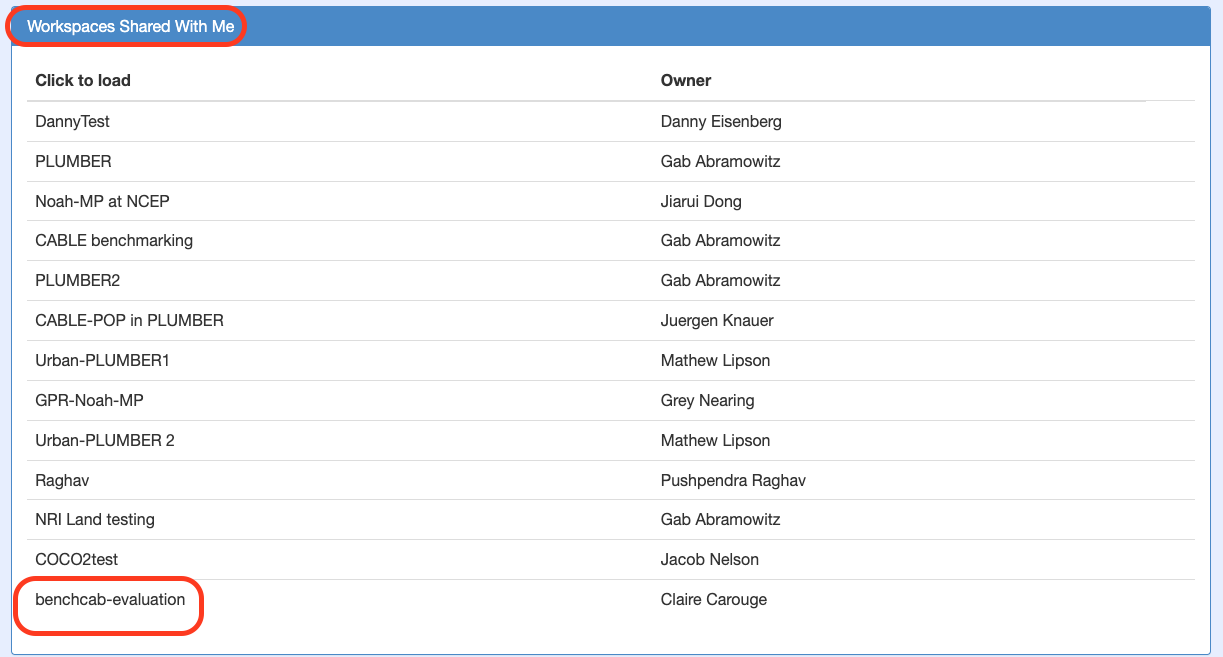
Workspaces available to you -
benchcabrequires access to the necessary permissions for interfacing withmeorg. Usemeorg initialiseto create the credentials file.
Initialising meorg_client - Run
benchcab, making sure to setmeorg_output_nameastruefor one of the realisations to enable the analysis workflow (run as a PBS jobscript). Upon successful submission of the files and starting the analysis, the jobscript output will contain a link to check the analyses status/plots. - Once the analysis has completed, other than the direct link provided above, one can also view the generated plots by clicking view plots under "Analyses".
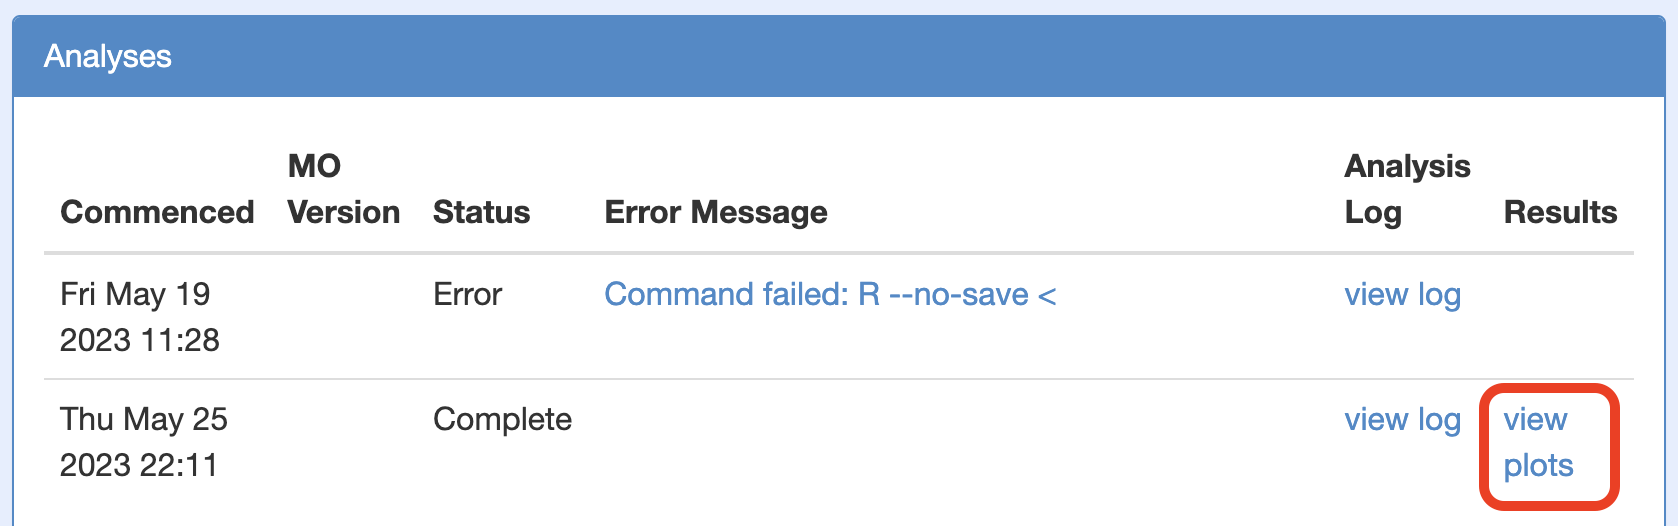
Link to plots
Contacts
Please enter your questions as issues on the benchcab repository.
Alternatively, you can also access the ACCESS-NRI User support via the ACCESS-Hive forum.